Master How to Use an Outdoor Pizza Oven in 5 Easy Steps
Imagine the tantalizing aroma of freshly baked pizza wafting through your backyard, the gentle crackling of a wood fire, and the anticipation of biting into a perfectly crispy crust. You simply must learn how to use an outdoor pizza oven! It can transform your culinary adventures, bringing the authentic taste of wood-fired pizza right to your home.
This comprehensive guide will walk you through every step of using an outdoor pizza oven, from initial preparation to advanced cooking techniques and essential maintenance tips.
Getting Started with Your Outdoor Pizza Oven
Before you can start creating mouthwatering pizzas, it’s crucial to understand the basics of your outdoor pizza oven and how to prepare it for cooking.
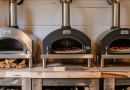
Understanding Your Oven Type
Outdoor pizza ovens come in various styles, each with its unique characteristics:
- Wood-fired ovens: These traditional ovens offer authentic flavor and high heat.
- Gas-powered ovens: Provide consistent temperature control and convenience.
- Hybrid ovens: Offer the flexibility of both wood and gas fuel options.
Knowing your oven type is essential for proper preparation and cooking techniques.
Choosing the Right Fuel
The type of fuel you use depends on your oven’s design and your personal preferences:
- Wood-fired ovens: For the best flavor, select seasoned hardwoods like oak, maple, or fruitwoods. Avoid softwoods, which can impart an unpleasant taste.
- Gas-powered ovens: Ensure you have a proper propane or natural gas connection.
- Hybrid ovens: Stock up on wood and gas to take advantage of your oven’s versatility.
Preheating Your Outdoor Pizza Oven
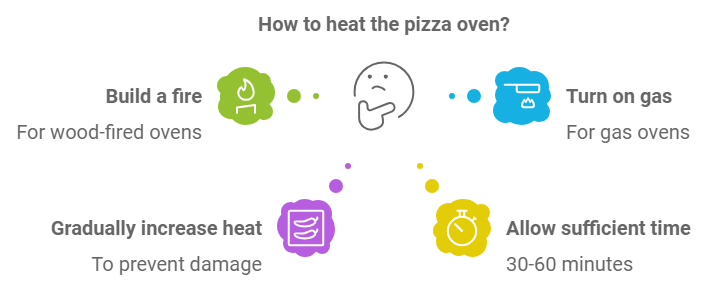
Proper preheating is crucial for achieving the perfect pizza. Follow these steps:
- Start the fire: For wood-fired ovens, build a fire in the center of the oven. For gas ovens, turn on the gas and ignite the burner.
- Gradually increase heat: Add more fuel gradually to raise the temperature. This slow build-up helps prevent damage to the oven structure.
- Allow sufficient time: The oven should heat for 30-60 minutes, depending on its size and the ambient temperature.
- Check for readiness: The oven is ready when the inner dome turns white (for wood-fired ovens), and the floor temperature reaches about 750°F (400°C).
- Use an infrared thermometer: This tool can help accurately measure the oven floor temperature.
Pro Tip: Place a pizza stone in your oven during preheating. This helps distribute heat evenly and creates a perfect cooking surface for your pizza.
Mastering Pizza Preparation
Creating the perfect pizza starts long before it enters the oven. Here’s how to prepare your pizza for cooking success:
Crafting the Perfect Dough
While we won’t delve into specific recipes, here are some key points for pizza dough success:
- Use high-quality, high-protein flour for a chewy, flavorful crust.
- Allow your dough to rise slowly in the refrigerator for enhanced flavor development.
- Bring the dough to room temperature before stretching.
Stretching Your Dough
Properly stretched dough is crucial for a great pizza:
- Dust your work surface with flour to prevent sticking.
- Press the dough outward from the center, preserving the air bubbles in the outer crust.
- Use your knuckles to stretch the dough, allowing gravity to do most of the work.
- Aim for an even thickness across the base, with a slightly thicker outer crust.
Topping Your Pizza
Less is often more when it comes to pizza toppings:
- Use a light hand with sauce to prevent a soggy crust.
- Choose quality ingredients that complement each other.
- Avoid overloading the pizza, which can lead to uneven cooking.
Cooking Techniques for the Perfect Pizza

Now that your oven is hot and your pizza is prepared, it’s time to cook. Follow these techniques for the best results:
Using a Pizza Peel
A pizza peel is essential for safely transferring your pizza in and out of the oven:
- Dust the peel with flour or cornmeal to prevent sticking.
- Work quickly to transfer the pizza to prevent the dough from sticking to the peel.
- Practice the quick “jerk” motion to slide the pizza off the peel and onto the oven floor.
Placing the Pizza in the Oven
Proper placement is key to even cooking:
- Aim for a spot near the fire, but not directly in front.
- Use a swift, confident motion to slide the pizza off the peel.
- If you miss your mark, quickly adjust the pizza’s position using the peel or a long-handled pizza turner.
Monitoring and Rotating
Constant attention is necessary for a perfectly cooked pizza:
- Rotate the pizza every 20-30 seconds for even cooking.
- Watch for bubbles in the crust and deflate them if they become too large.
- Look for signs of doneness: a golden-brown crust and bubbling cheese.
Removing and Serving
Once your pizza is perfectly cooked:
- Use the peel to remove the pizza from the oven.
- Transfer it to a cutting board or serving platter.
- Allow it to cool for a minute before slicing to let the cheese set slightly.
- Slice and serve immediately for the best texture and flavor.
Advanced Techniques and Tips
As you become more comfortable with your outdoor pizza oven, try these advanced techniques:
Managing Oven Temperature
Different pizzas and dishes require different temperatures:
- Neapolitan-style pizzas cook best at very high temperatures (800-900°F).
- New York-style pizzas prefer slightly lower temperatures (600-700°F).
- You’ll want even lower temperatures for dishes like roasted vegetables or bread.
Learn to manage your fire or gas flow to achieve and maintain these various temperature ranges.
Experimenting with Different Styles
Don’t limit yourself to one type of pizza:
- Try thin-crust Roman-style pizzas.
- Experiment with thick-crust Sicilian squares.
- Attempt a stuffed Chicago-style deep dish.
Each style will require adjustments to your cooking technique and oven management.
Cooking Beyond Pizza
Your outdoor pizza oven is versatile:
- Roast meats and vegetables as the oven cools down after pizza-making.
- Bake artisanal bread in the residual heat.
- Try cooking dishes in cast iron skillets or Dutch ovens inside your pizza oven.
Maintaining Your Outdoor Pizza Oven
Proper maintenance ensures your oven’s longevity and consistent performance:
Regular Cleaning
Keep your oven in top shape with these cleaning tips:
- Allow the oven to cool completely before cleaning.
- Remove ash and debris with a brush and metal scoop.
- For stubborn stains, use a damp cloth when the oven is cool.
- Never use chemicals or soap inside your pizza oven.
Protecting from the Elements
Shield your investment from weather damage:
- Cover your oven when not in use to protect it from rain and debris.
- For built-in ovens, consider a custom-fitted cover.
- Ensure proper drainage around your oven to prevent water damage.
Seasonal Maintenance
Perform these tasks at the beginning and end of your pizza-making season:
- Inspect the oven structure for cracks or damage.
- Check and clean the chimney or flue.
- For gas ovens, have a professional inspect the gas connections annually.
Curing a New Oven
If you’ve just installed a new oven, proper curing is essential:
- Start with small fires and gradually increase their size over several days.
- Allow the oven to cool completely between firings.
- This process helps remove any residual moisture and prevents cracking.
Final Thoughts
Mastering the art of using an outdoor pizza oven is a rewarding journey that combines culinary skills with the joy of outdoor cooking. By following these preparation, cooking, and maintenance tips, you’ll be well on your way to creating restaurant-quality pizzas in your own backyard. Remember, practice makes perfect, so don’t be discouraged if your first attempts aren’t flawless. With time and experience, you’ll develop a feel for your oven and create pizzas that will delight family and friends alike.
Embrace the learning process, experiment with different techniques, and, most importantly, enjoy the delicious results of your efforts. Your outdoor pizza oven is more than just a cooking appliance; it’s a gateway to countless memorable meals and gatherings. So fire up that oven, gather your ingredients, and embark on your pizza-making adventure!
FAQ
Q: How long does it take to preheat an outdoor pizza oven?
A: Preheating typically takes 30-60 minutes, depending on the oven’s size and fuel type. Wood-fired ovens generally take longer than gas-powered ones.
Q: Can I cook other foods in my outdoor pizza oven?
A: Absolutely! Outdoor pizza ovens are versatile and can be used for baking bread, roasting meats, cooking vegetables, and even desserts. The high heat and unique cooking environment can add fantastic flavor to many dishes.
Q: How often should I clean my outdoor pizza oven?
A: It’s best to remove ash and debris after each use. Based on the frequency of use, perform a more thorough cleaning monthly or as needed. Always ensure the oven is completely cool before cleaning.
Q: What’s the ideal temperature for cooking pizza in an outdoor oven?
A: The ideal temperature for cooking pizza in an outdoor oven is typically around 750°F (400°C) for the oven floor. However, this can vary depending on the style of pizza you’re making. Neapolitan-style pizzas often cook best at even higher temperatures.